This article describes in detail the correct procedures for two-stage cementing or multi-stage / multistage Primary cementing operations in oil and gas wells. Of course, these procedures come after the casing running operations and single stage casing cementing operations
What Is Multistage / Multi Two Stage Cementing
The overpressures from a primary cementing column in any casing string type annulus, especially for long casing strings, may be too high for the formation, and as a result mud losses and/or fracturing may be induced and the top of cement will not reach its objective. So by carrying out the cementing operation in two / multi or more stages. Special tools are needed to be capable of carrying out such multistage cementing.
Cementing Procedures
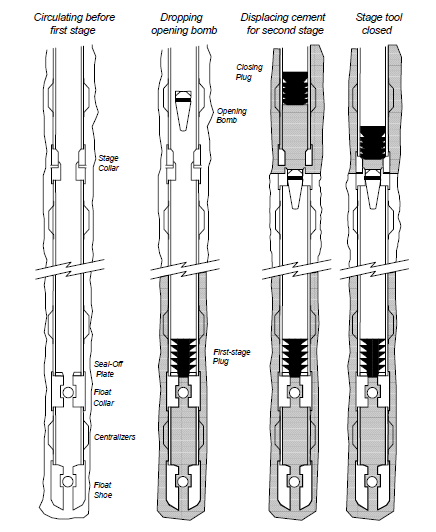
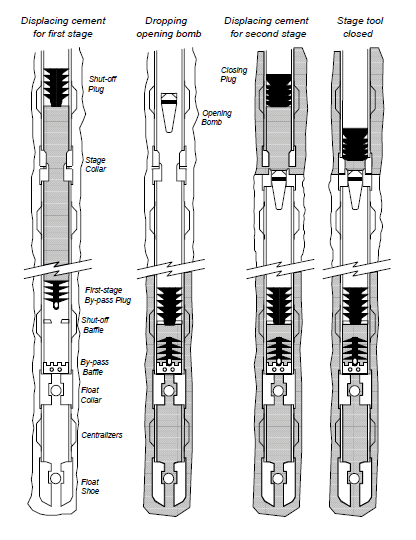
- The appropriate position of the stage tool in the casing string is always given in the drilling program.
- Drop the bomb (opening plug) immediately after the first stage cement job according with floating equipment. Record the opening time.
Note: In relation to the drift angle of a directional well, mud density and mud rheological properties, heavier bombs may be selected.
- Open the two / multi stage cementing collar. Follow the manufacturer’s procedure for the stage tool opening pressure and approximate bomb landing time. If difficulty is experienced in opening the stage collar occurs, re-check the pumping circuit and relevant valves before a final decision is made to reduce the tension on DV sleeves by slacking-off weight of the hook.
- With the stage collar opened, start circulation with a low pump rate, keeping the mud level under control. Increase the pump rate only when it is certain that no cuttings or cement contamination will cause bridges and compromise the circulation due to fracturing below the stage collar. Circulate a volume equal to the total open hole capacity from the stage tool to surface, checking the eventual excess cement slurry returns.
- During circulation and after bottom’s up, record the pressures at each different flow rates. The bottoms up must be analysed with a gas detector, if the are gas-cut keep circulating until normal again. If necessary, wait on cement for the first stage cement slurry.
- Prepare for the second stage cement job as per the Cementing Programme.
- Perform the second stage operation as soon as the cement setting time of the first stage is complete (at least twice the thickening time). A Lab only test is recommended.
- Arrange the by-pass manifold at the rig floor with double lines (pumping and reversing out).
- Keep the casing in tension with the slip elevator as required by casing hanging calculations (Refer to the Drilling Programme).
- Prepare the wellhead (with partially made up bolts) and Blowout Preventer lifting system to quickly hang the casing string after the second stage cement job.
- With the mud well balanced, insert the closing plug into the cementing head. Check the stop pin, indicating flag and the circulation manifold.
- Pump the first cushion and pump the cement slurry.
- Launch the closing plug and verify its release.
- Displace the slurry with a pump rate in accordance with the Cementing Programme previous circulation tests. Make sure that the hydraulics of annulus are correctly considered to avoid fracturing (if a stage tool-packer is not provided).
- Configure the surface mud system to recover the excess cement slurry, spacer, contaminated mud.
- Close the stage collar with the pressure advised by the manufacturer’s instructions. After pressure testing, gradually bleed off the pressure.
- Wash through all the inlets in the wellhead and BOP stack with water.