In this article, we will discuss the practical right steps for the single-stage primary casing cementing job procedure in oil and gas wells. We have also discussed the multi-stage cementing job in one of our articles before. And we have summarized the important tips for successful primary cementing & Casing Cementing calculations to assist you in your job.

Circulation Before the Job
- Line up to the rig mud pumps. Break circulation slowly. When it has been determined that full returns have been established, gradually increase the pump rate and circulate the total hole volume. Record the pressures at the various flow rates. Record the pressure with the estimated displacement rate at the end of circulation.
- During circulation, monitor pit levels, bottoms-up mud properties, and eventual shows.
Surface Checks
- After bottom circulation, line up the cement head to the manifold.
- Check the lines and connect the cementing manifold to the rig mud pumps. All manifold lines shall be flushed with water and pressure tested to 5,000 psi before the job.
- The Mud Engineer shall record initial pit levels. He shall be present at the mud pits during the single-stage cementing and displacement operations, reporting any loss on returns, pertinent facts, and data.
- In all operations, a top and bottom plug shall be utilized unless specified in the Programme. The 30” and 20” casings will be cemented through an inner string.
- Nonrotating PDC drillable plugs are recommended to enable further drilling phases.
Mixing CMT
- In advance to the primary cementing job, the water and cement shall be checked to ascertain that the chemical characteristics are the same as the samples used in the pilot tests.
- Mix the spacer.
- Mix the cement to the required slurry weight and have the weight checked regularly. A pressurized mud balance is recommended to reduce any air entering the system to a negligible volume. The use of this tool provides advantages:
- A fluid density value is virtually identical to that under actual downhole conditions.
- The correct water/cement ratio. It must be noted that changing the W/C ratio means the number of additives in the slurry also changes.
- When mixing CMT, slurry samples shall be collected in numbered containers and taken at the start, middle, and end of each type of slurry. Also, take water, mixing water samples and one sample of dry cement from each tank used.
- For the single-stage slurry recipe & Cementing Additives, follow the Casing Cementing Design Programme.
- Leave the mixing tube full of the required weight slurry after mixing to avoid the possibility of pumping diluted CMT or possibly water into the casing before the top plug is released.
First Stage Primary Cementing & Displacement Procedure
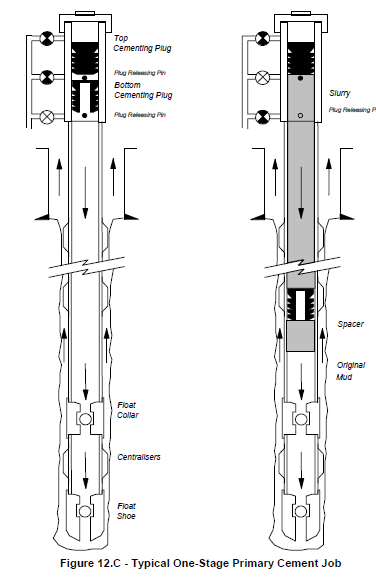
- Pump the spacer. Unless the effective mud density required to control formation pressure dictates otherwise, all cement jobs shall be flushed with a water spacer. The spacer volume shall be equivalent to circulation three minutes of contact time. The drilling program will specify other particular spacers related to mud weight and the system in use (contact time, compatibility with the slurry, etc.).
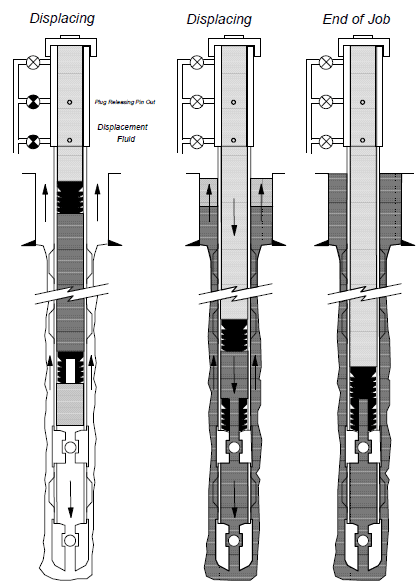
- Flush the cement from the lines before releasing the top plug.
- The Operator shall release the top plug, and the oil and gas Company Completion and Drilling Supervisor (drilling engineer) shall personally witness the process.
- Switch over to the rig pumps. The cement pumping unit shall be ready, waiting to take over if any malfunction or pressure becomes excessive for the rig pumps.
- Displace the cement with mud at the maximum permissible rate and surface pressure unless stated in the Cementing Programme for the single stage.
- Slow the pumps if there is a loss of returns (circulation lost problems) during the displacement to regain circulation.
- If returns cannot be regained, continue to displace the cement at the lowest permissible rate (unless otherwise advised) and record the returns.
- Stop displacement only if the pressure exceeds 70% of the casing burst pressure or 5,000 psi, whichever is the least.
Bump The Plug
- Reduce the flow rate at the end of the operation to avoid any sudden pressure surge when bumping the plug.
- Bump the plug and pressure up to conduct the casing pressure test. Release the pressure gradually as soon as possible to avoid the microannulus effect.
- The bumping pressure values are always given in the Drilling Programme.
- Should the plug not bump, never over-displace more than half the shoe truck volume (between collar and shoe).
Final Checks For The Single-Stage Cementing Job
- Check for backflow to ascertain if the float shoe and collar are holding.
- If the float equipment fails, shut in the well by closing the standpipe manifold for a period of at least long enough for thickening. Monitor the pressure gauge so that required pressure can be maintained by bleeding excessive pressure periodically.
- In this case, the pressure remaining must not exceed the observed differential pressure between the mud and CMT.
Single Stage For Large-Size Casing
- The single-stage displacement procedure for cementing 30″ CP and 20″ surface casing is as follows:
- The displacement volume should be approximately 1 bbl less than the theoretical volume.
- Check for returns. If the floating equipment is holding back pressure, pick up the cement stinger, circulate, and retrieve the inner string. If floating equipment is not holding the back pressure, pump the volume bleed back plus 1 bbl, fill up the annulus (required), hold the pressure on the inner string, and wait on CMT.
- Keep the annulus under control to be sure that seals are holding the pressure.
- At the end of the single-stage surface casing cementing job, carefully wash the annulus between the CP and the surface casing to at least 5m below the seabed to allow well abandoning operations making the seabed free from any obstructions.
Notes
- Record all mixing, displacing, and bumping operations on a pressure recorder.
- Consider reciprocating the casing during and after the primary cementing job procedure to maximize the bonding performance.