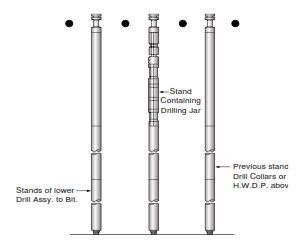
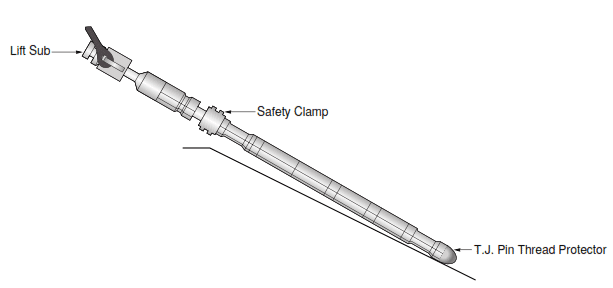
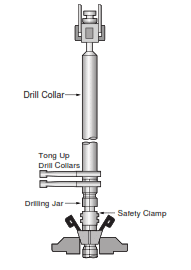
Jars are approximately thirty feet long. Heavy-duty lift subs for tapered shoulder elevators are typically used for handling.
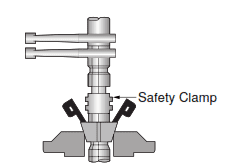
Jar Safety Clamp
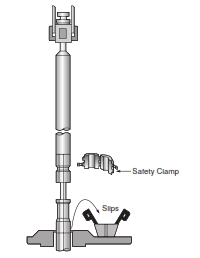
When handling the Drilling Jar above the rotary table, the safety clamp must be on the Jar. This keeps the Jar in a safe, extended position while being handled. The safety clamp is removed when the Jar is lowered into the hole; see the Figure below
Picking Up The Jar
Step 1:
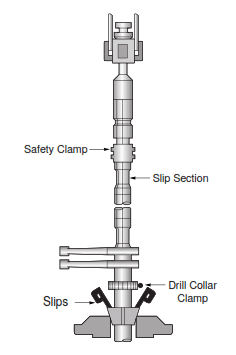
Place the lower drill assembly in the drilling slips.
Step 2:
- Place thread protector on the joint tool thread.
- Clamp drilling elevators around the Lift Sub.
- Pick up Jar with elevators.
Note: Leave the safety clamp on the Jar.
Third Step:
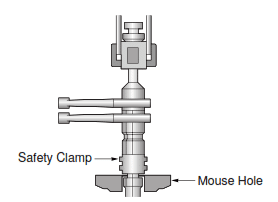
- Put Jar in a mouse hole.
- Tong up lift sub.
Step 4:
- Make up Jar into lower drilling BHA assembly in the rotary table.
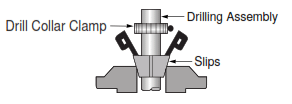
- Remove the drill collar clamp
- Lower the drill string until the slips can be set in the slip section of the Jar.
Step 5:
- Remove Lift Sub.
- Make up the next complete stand of drill collars of HWDP into the top of Jar.
- Tong up drill collars.
Note: Leave the Safety Clamp on Jar.
Step 6:
- Pick up drill collars or HWDP.
- Remove the slips.
- Slightly lower the string.
- Remove the Jar Safety Clamp.
- Lower the drilling assembly into the hole.
Establishing the Jar Load
With the Jar in the hole, the tool’s control is in the drawworks operator’s hands. Use the Weight Indicator Reading and the Working String Weight above Jar to establish jar load. Compare the load to the Specification for the minimum and maximum detent load. In the following examples of drilling jar operation, it is necessary to calculate the ‘working’ string weight above the Jar and drag before calculating the jar load. This weight is calculated as follows:
Working String Weight Above the Jar = Drag + String Weight From The Drilling Jar To Surface.
Drag = Weight Indicator Reading Up – Weight Indicator Reading Down.
CAUTION: To prevent damage to the Drilling Jar, do not exceed the maximum detent working load (Jar Specification Table) during the up-jar cycle or down-jar cycle.
Example 1: Jar Load “Up”
Up Load on Drilling Jar = Final Weight Indicator Reading Up, before impact – Working String Weight Above the Jar.
- The final weight indicator reading up, before impact, is 250,000 lb
- Working string weight above the Jar is 150,000 lb
- Which results in a jar up load of 100,000 lb
Example 2: Jar Load “Down”
Down Load on Drilling Jar = Final Weight Indicator Reading Down, before impact – Working String Weight Down.
- The final weight indicator reading down before impact is 120,000 lb
- The working string weight above the Jar is 150,000 lb
- Which results in a jar down load of 30,000 lb
Changing the Jar Load
The impact can be changed by adjusting the working load on the Drilling Jar.
Changing the Jar Cycle
If the delay time between blows is too short, it can be extended by applying more load when setting the tool. Extending the delay time also makes applying higher working detent loads possible, increasing the impact force. Shows the normal relationship between load (at the Jar) and time (before impact) for a given jar size. The chart can establish the delay time for a given pull (or push) load.
Up-Jarring Operation
Firstly: Establish the jar load ‘up’ within the range shown in Drilling Jar Specifications Table.
Secondly: Apply pull to the drill string per the established final weight indicator reading, then wait for the Drilling Jar to impact. There will be a slight loss of indicator weight just before impact, corresponding to the retraction of drill string length. There should be a clear indication on the weight indicator after the Drilling Jar has been impacted.
Thirdly: To repeat the operation, slack off 10,000 to 15,000 lb below the working load down and immediately apply the previous up-jar load.
Down-Jarring Operation
CAUTION: Do not permit spudding down or dropping larger loads than the jarring mechanism is designed to withstand.
- Firstly: Select a jar load ‘down,’ within the range shown in Drilling Jar Specifications Table or within the weight range just above the Drilling Jar.
- Secondly: Slack down per the established final weight indicator reading, then wait for the Drilling Jar to impact.
- Thirdly: Pick up on the string until the weight indicator is above the ‘working’ string load by 10,000 to 15,000 lb, then immediately slack off to the previously selected down jar load.
- Fourthly: Wait for the Drilling Jar to impact down according to delay time vs. overpull manufacturer charts
- Fifthly: Repeat Step 3 for additional blows.
Down-jar impacts may not be transmitted through shock tools run in the lower drilling assembly. When jarring down with small amounts of drill collars or HWDP on top of the Jar, select a load range that will not buckle the drill pipe, and run above the Jar.
Up And Down Jarring Operations
- Firstly: Select jar load for up and down, as described in Examples 1 and 2.
- Secondly: Carry out the up-jar sequence, as described in the Up-Jar Operation.
- Thirdly: Once the Drilling Jar has impacted up, slack off until the selected down weight on the Drilling Jar is achieved, as described in Down Jar Operation.
- Fourthly: The weight indicator will reflect when the Drilling Jar impacts down.
- Fifthly: Repeat Steps 2 through 4 to continue the operation.
Setting The Drilling Jar Prematurely
If the Drilling Jar is prematurely set, the string must be suspended in the elevators and allowed to impact. Following the impact, it may be run to depth. If it is set in the hole, leave the elevators on the pipe until the impact before continuing tripping pipe operations. When coming out of the hole, do not slack off more than six inches before setting the slips in the rotary, or the Drilling Jar may set for an up-jar impact.
Coming Out Of The Hole
Step 1:
- Attach the Safety Clamp on the polished shaft of the Jar as the Drilling Jar comes through the rotary table and before setting the rotary slips.
- Moderately tighten the two bolts of the safety clamp. Do not over-tighten safety clamp bolts.
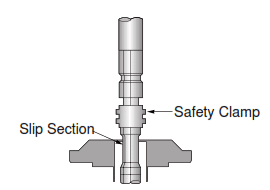
Step 2: Set rotary slips on the slip section of the Jar. Break off and stand back drill collars or HWDP. (Jar may be changed out at this point.)
Third Step: Make up and tong up lift sub into the Drilling Jar, then hoist out the next stand
Fourth Step: Stand back Jar with stands of drill collars or HWDP. The Drilling Jar should be at the top of the stand.