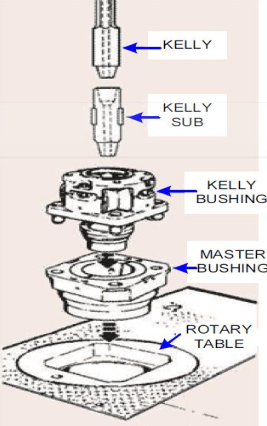
The Kelly drive bushing engages the master bushing in the rotary (either square drive or pin drive). As the rotary turns, the Kelly drive bushing turns with it to drive the Kelly. At the same time, as the Kelly works down, the rollers in the bushing allow the Kelly free movement and keep it centered in the rotary bore. In other words, it serves as a connection point between the rotary table and the drill string, enabling power transmission from the rotary table to the drill bit.
The earlier square Kelly bushings worked fine in the square drive master bushings, but as wells became more profound, longer drill pipe slips were needed, so the pin drive system was developed. While developing the pin drive Kelly bushings,
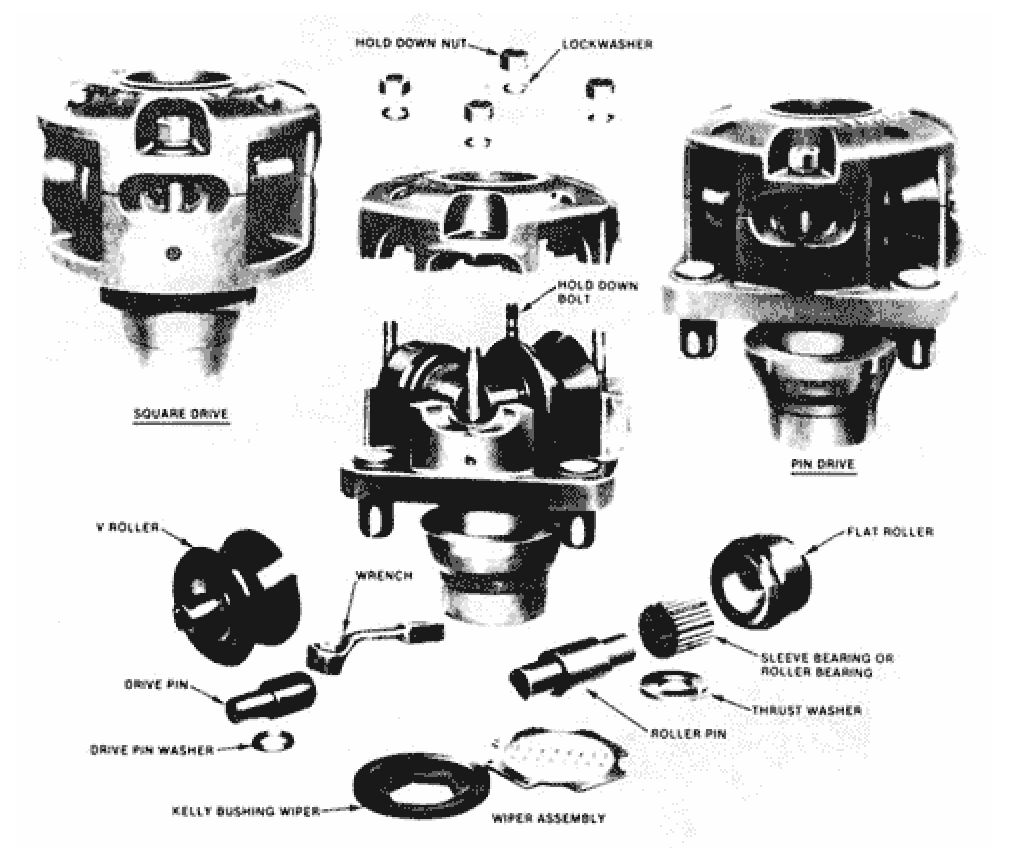
How Does Kelly Bushing Work?
The rotary table’s motion is transferred to the bushing via pins and then to the Kelly through its square or hexagonal flat surfaces. As the Kelly is screwed into the top of the drill string, it will rotate the entire string. When the Kelly is disconnected from the string and set back, the drive bushing is lifted and set back with it.
Kelly Bushing Designs
Two primary designs are double-plane rollers and single-plane rollers.
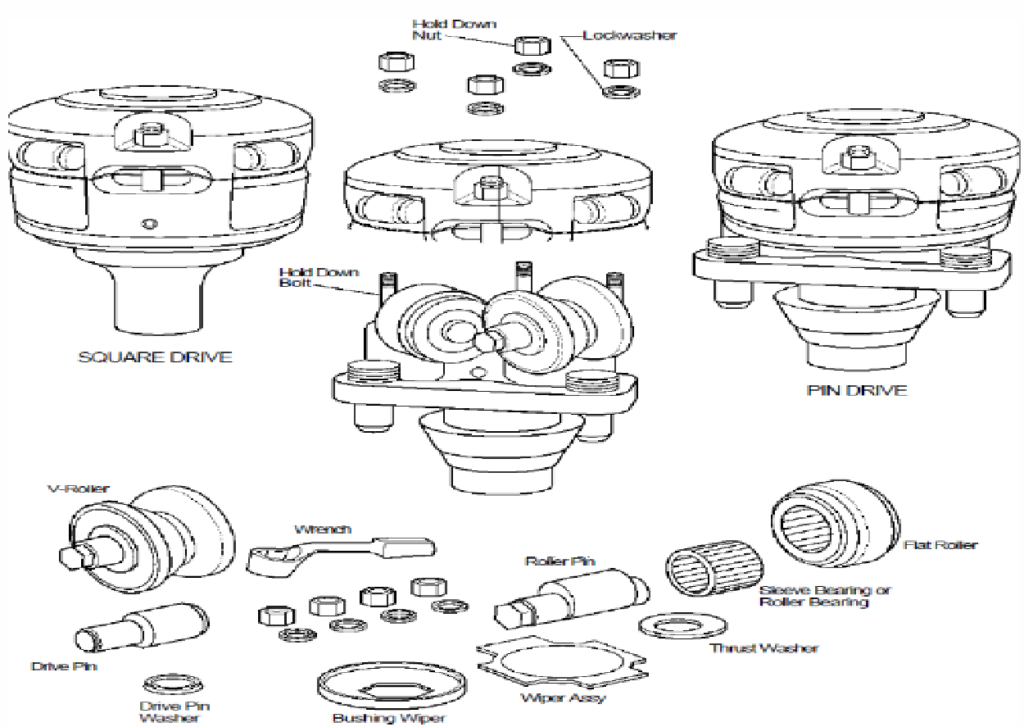
The initial design features use two rollers for each driving surface on the Kelly. The rollers are stacked in cages, with all roller pins and bearings being part of the assembly. The cages are removable from the bushing body. The two-plane roller type for hex kellys is adjustable for Kelly and bushing wear, but the two-plane roller type for square kellys is not adjustable.
As we have mentioned above, they have two basic designs. The second one drives rollers in one plane, which may have a split or solid body casing, depending on the manufacturer.
- In a solid cast body, replaceable sleeves support the roller pins. To remove a roller assembly, remove the retaining pins, the roller pin from the side, and the roller from the back.
- In the split body design, the roller pins are held in place by the body journals and secured by top nuts that fasten the two body halves together. To replace the roller assemblies, remove the cover and access the rollers.
Pin Drives & Square Drives
Kelly bushing can be engaged with the master one by drive pins, as shown in the below figure. Pin Drives utilize steel pins to connect the rotary table and the KB. These pins are inserted into corresponding holes in both components, creating a secure and reliable connection. The steel pins provide stability and prevent unwanted shifting or misalignment during drilling operations.
On the other hand, Square Drives utilize flat surfaces instead of steel pins. The flat surfaces on the rotary table and the Kelly Bushing are mated together, creating a strong and stable connection. The flat surfaces ensure precise rotary motion by eliminating any potential slippage or rotation issues.
Installation of Kelly Bushings
- Lift and set KB in the master bushing.
- Remove four nuts and lock washers.
- Lift the top half of KB off the studs and set aside.
- Remove the four roller assemblies from the lower half of the KB.
- Set the top half of the KB loosely on the bottom half.
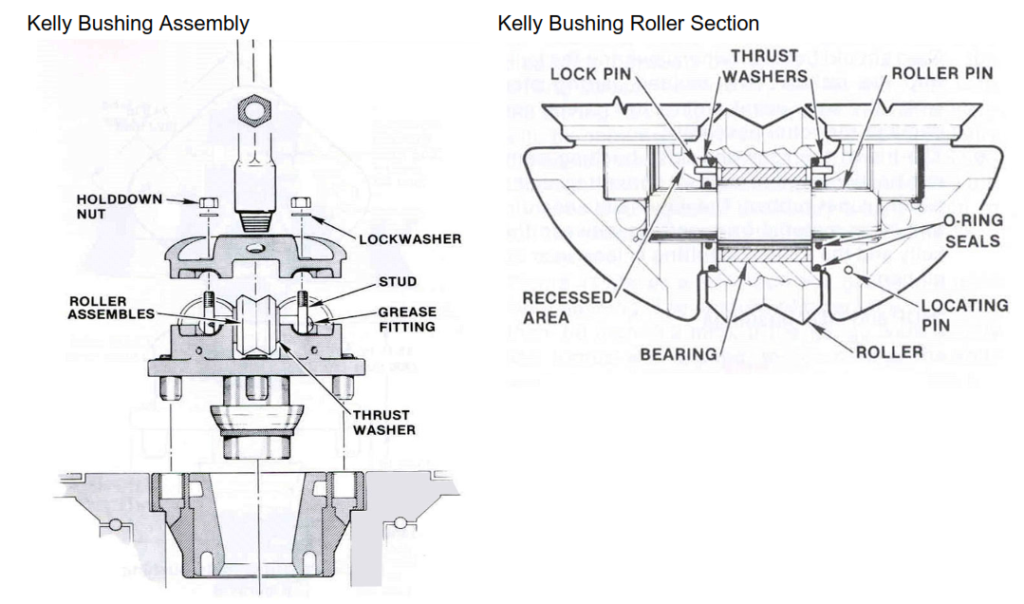
Note: Make sure that thrust washer lock pins (Figure 1) are toward the center of the bushing and lie in the recessed areas of the lower body half. All KB thrust washers come with Orings on the inside and outside diameters. These )-rings help retain grease in the roller bearing while keeping mud and water out.
- Stab Kelly through the bushing.
- Lift the top half of the bushing and reinstall the roller assemblies.
- Lower the top half of the KB, aligning it with the locating pin.
- Instal lock washers and nuts, then tighten alternately until secure.
- Apply multipurpose, water-resistant grease to the roller pin grease fitting before putting the bushing into service.
Operations
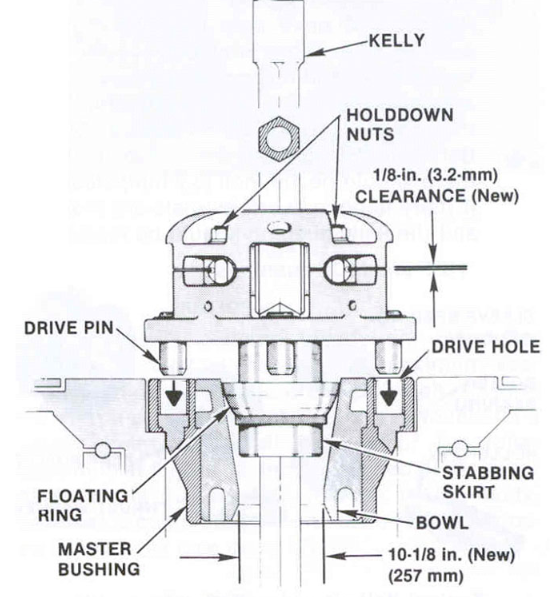
- Lower KB into the master bushing (Figure 1). The skirt will follow the taper down into the throat of the master bushing. The floating ring (HDP and MDP bushing) will sit in the upper portion of the master bushing, centering the KB.
- It is recommended that the rotary table be turned slowly as the Kelly bushing is lowered. The bushing will center, and the drive pins* will stab into the drive holes of the master bushing.
- The skirt should be greased to allow the Kelly floating ring to move quickly.
- Care should be taken when lowering the Kelly into the rathole. Any sudden, jarring stop when the Kelly upset strikes the rollers can damage the roller assembly.
- The life of the Kelly and drive bushing parts can be increased by at least 20 percent by using a Kelly wiper rubber. The wiper will keep dirt and other material from getting between the Kelly and the rollers, reducing wear on all parts.
Note: Applying grease to the Kelly will increase the life of the wiper rubbers.
Kelly Bushing Maintenance
Like the rest of the rotary rig components, the bushing has a long service life (approximately eight years). Below are the significant maintenance steps that the toolpusher shall conduct periodically.
- Tighten hold-down nuts weekly (Figure 1).
- Grease roller assembly daily at four fittings.
- Grease stabbing skirt for ease of stabbing.*
- Replace drive pins when the bottom taper is too worn to aid in the stabbing.
- Replace the drive hole bushing in the master bushing when worn to an egg shape.
- Replace the API drilling bowl when wearing it in the throat area that exceeds 10-7/8 inches (276 mm). Proper throat size is necessary for good stabbing.
- Between the top and bottom body halves, there should be 1/8 inch (3,2 mm) clearance; if there is none, worn journals are indicated, and the Kelly bushing should be replaced.
Inspection
The routine inspection of the Kelly bushing is performed as follows:
- Check to see if the top nuts are tight.
- Use a bar to check for body wear and roller assembly wear.
- Check clearance between rollers and Kelly.
- Check rollers and assemblies for wear.
- Check the body for wear.