Before starting leak off test drilling procedures, gauges should be checked for accuracy. Also, the upper-pressure limit should be determined. It is so simple to run leak off test drilling but if you exceeded certain pressure, you may break the formation and a loss of circulation may occur.
Leak Off Test Best Practice
Pre-job Procedures.
- A casing test will be performed during the kick drill, before drilling out the shoe to ensure casing and connection integrity. Record volume versus pressure
- Obtain an estimate of the expected leak-off pressure from offset wells or from an appropriate fracture gradient prediction technique, e.g. Fracture Gradient Predictor software.
- Determine the surface pressure required to reach the expected leak-off pressure given the proposed weight of mud in the hole.
- From the estimated surface pressure in step 3, the volume versus pressure plot measured in step1 and the proposed pump rate, determine the length of time expected to reach leak off.
- If the time is less than 4 minutes then consider
- using a lower mud weight for the test, or
- reducing the pump rate to ensure that at least 4 minutes of build-up is observed before leak-off.
Note: It is best to see a minimum of four pressure readings before leak-off occurs to characterise the linear build of the pressure curve so that leak-off can be recognised.
Procedure
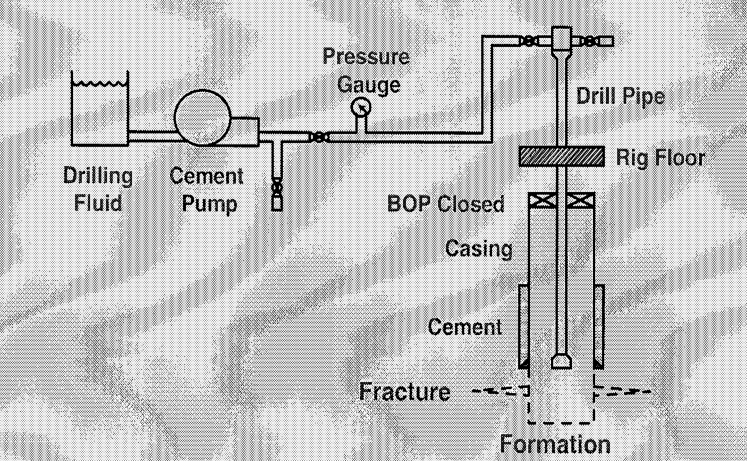
These operational drilling procedures are designed to determine the equivalent mud weight at which the formation will accept fluid. This test is not designed to break down or fracture the formation. This leak off test is normally performed at each casing shoe. Prior to the formation leak-off, have a handy piece of graph paper (see graph 1 ), a pencil, and a straight edge (ruler). Utilizing the high-pressure cement unit, perform leak-off as follows:
- Upon drilling float equipment, clean out the rat hole and drill 15 ft of the new hole. Circulate and condition the hole clean. Be assured mud weight in and mud weight out the balance for the most accurate results.
Note:
1- Take care to clean the rat hole properly, so that the induced fracture will not be propped open by cement or cuttings debris.
2- Consider pumping a hi-vis/hi-density pill to aid in clearing cuttings, which must be circulated out of the hole before the start of the test.
3- If the mud weight is to be increased before drilling ahead, perform leak off before increasing the mud weight to be able to optimize the display of the pressure/volume plot.
- Pull drilling bit up to just above casing shoe. Install circulating head on DP.
- Rig up a cement unit and fill lines with mud. Test lines to 2500 psi. Break circulation with cementing pump, be assured bit nozzles are clear. Stop pumping when circulation is established.
- Close pipe BOP rams. Position and set motion compensator, overpull drill pipe (+/- 10,000 lbs), close choke/kill valves.
- Continue leak off test at a slow rate (i.e. 1/4 or 1/2 BPM), pump mud down DP as follows
- Pump 1/4 bbl – record/plot pressure on graph paper.
- Pump 1/4 bbl – record/plot pressure on graph paper.
- Pump 1/4 bbl – record/plot pressure on graph paper.
- Pump 1/4 bbl – record/plot pressure on graph paper.
- Pump 1/4 bbl – record/plot pressure on graph paper.
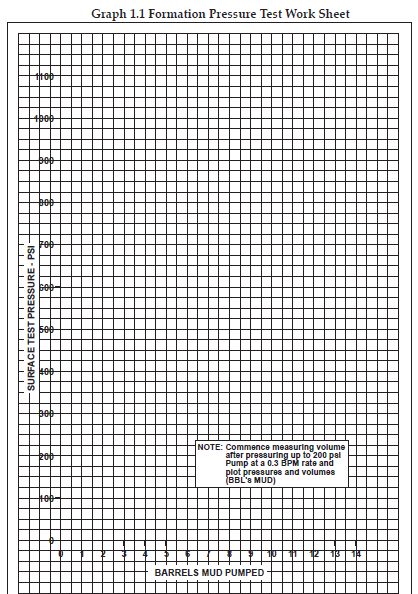
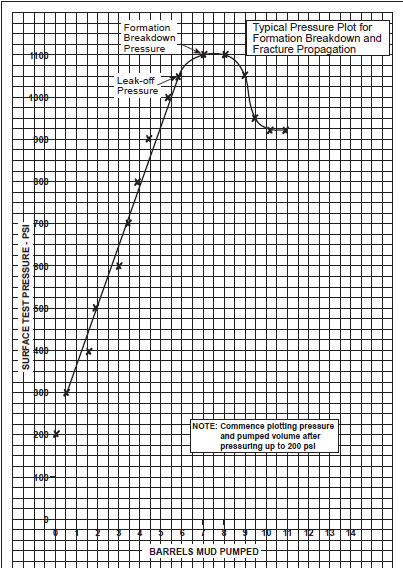
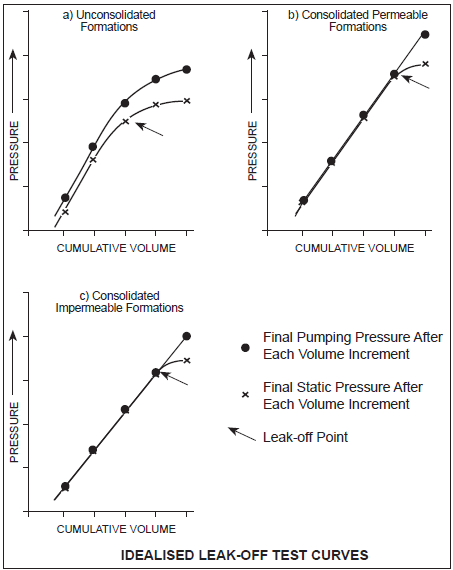
- Continue this slow pumping. Record pressure at 1/4 bbl increments until two points past leak-off. (See examples, Graphs 1, 2 & 3.)
The planned pump rate should be a rate that builds pressure at a minimum of one half the rate observed in the casing test. Typically, this would 0.5 bbls/min. However, in shallow or higher permeability sediments, higher pump rates may be required. If the initial pressure build rate is too low, repeat the test at a higher test rate. Pump rates of (0.75 to 1.0 bbls/min) may be required to get a satisfactory test.
Caution: low-pressure build rates can also be indicative of significantly increased borehole volume which may indicate the lack of cement behind the casing shoe.
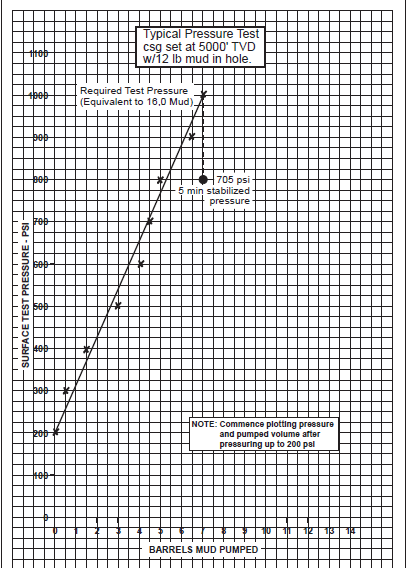
- Upon two points above leak-off, stop pumping. Allow pressure to stabilize. Record this stabilized standing pressure (normally will stabilize after 15 mins or so).
- Bleed back pressure into cement unit tanks. Record volume of bleeding back.
Bleed back should be done with a constant and low rate.
- Rig down and cement unit lines. Proceed with drilling operations.
- Leak-off can be repeated after step 6 if data confirmation is required, otherwise, leak off test is complete.
NOTE: For 20″ and 13 3/8″ CSG leak off tests, plot pressure every 1/2 bbl. The results will be the same. It should be noted that in order to obtain the proper leak off and pumping rate plot, it will be necessary to establish a continuous pump rate at a slow rate in order to allow time to read the pressure and plot the point on the graph. (Barrels pumped vs. pressure – psi), normally 1/2 BPM is sufficient time. A pressure gauge of 0-2000 psi with 20 or 25 increments is recommended.
NOTE: In the event that, Standing Pressure is lower than leak off point. Use standing pressure to calculate equivalent mud weight. Always note the volume of mud bled back into tanks.
Leak Off Test Pressure Equations
Field Units
LOT in equivalent mud weight = (LOT pressure ÷ 0.052 ÷ Depth of Casing Shoe TVD ) + (Working Mud Weight)
Where:
- Leak off test in equivalent mud weight in ppg
- Leak Off Test pressure in psi
- Casing Shoe TVD in ft
- Current Mud Weight in ppg
Note: Always round down for LOT calculation
Example:
Leak off test pressure = 1,600 psi
Casing shoe TVD = 4,000 ft
Mud weight = 9.2 ppg
Leak off test in equivalent mud weight (ppg) = (1,600 psi ÷ 0.052 ÷ 4,000 ft )+ 9.2ppg = 16.8 ppg
Metric Unit
Leak Off Test pressure in mud density
Leak off test in equivalent mud weight = (Leak Off Test pressure ÷ 0.00981 ÷ Casing Shoe TVD ) + (Current Mud Weight)
Where;
- Leak off test in equivalent mud weight in kg/m3
- Leak Off Test pressure in KPa
- Casing Shoe TVD in m
- Current Mud Weight in kg/m3
Note: Always round down for LOT calculation
Example:
Leak off test pressure = 1,740 KPa
Casing shoe TVD = 1,300 m
Mud weight = 1,100 Kg/m3
Leak off test in equivalent mud weight (Kg/m3) = (1,740 KPa ÷ 0.00981 ÷ 1,300 m)+ 1,100 Kg/m3 = 1,236 Kg/m3
Important Hints For A Successful Leak Off Test
- The casing should be tested prior to drilling out the shoe.
- Drill out the shoe and cement, exposing 5 – 10 ft of new formation.
- Circulate and condition the mud, check mud density in and out before running Leak off Test.
- Pull the bit inside the casing. Line up cement pump and flush all lines to be used for the test.
- Close Blowout Preventer.
- With the well closed in, the cement pump is used to pump a small volume at a time into the well typically a 1/4 or 1/2 bbl per min. Monitor the pressure build-up and accurately record the volume of mud pumped. Plot pressure versus volume of mud pumped.
- Stop the mud pump when any deviation from linearity is noticed between pump pressure and volume pumped.
- Bleed off the pressure and establish the amounts of mud, if any, lost to the formation.
Examples Of Leak Off Test Plot Interpretation
In non-consolidated or highly permeable formations fluid can be lost at very low pressures. In this case, the pressure will fall once the pump has been stopped and a plot such as that shown in Fig 1a will be obtained. Figs 1b and 1c show typical plots for consolidated permeable and consolidated impermeable formations respectively.
Related Video
there are a lot of videos explaining how to perform leak off test calculations and procedures. I have chosen one of them which I found that it was simple and clear.
Related Papers
Download Leak Off Test Calculation Sheet Report
