At times, you will need to mill out collapsed casing and repair the casing using a casing alignment tool. You can also use a string mill and casing alignment tool to repair split casing.
Bottom Hole Assembly
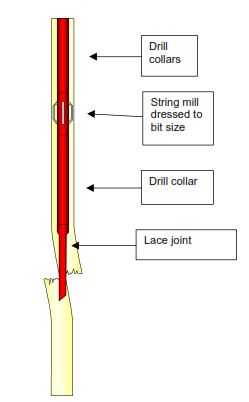
The bottom hole assembly should contain, from bottom to top (connecting to drill collars):
- lace /kick joint
- drill collar for added weight and stability
- full-gauge string mill dressed to drilling bit size.
See the diagram below.
Creating a Lace (Kick) Joint For Casing Alignment Tool
If the casing is completely split in two, then you will need to gain access to the bottom portion of the casing before you can begin your milling operation.
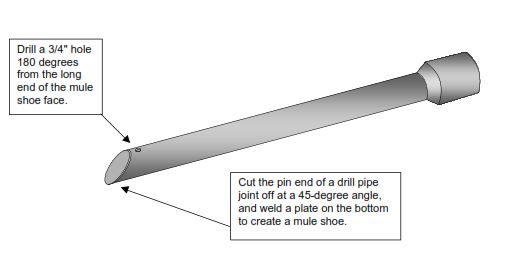
Make a kick joint by:
- cutting the pin end of a drill pipe joint off at a 45-degree angle
- welding a plate on the bottom to create a mule shoe
- drilling a 3/4″ hole 180 degrees from the long end of the mule shoe face.
See the diagram below.
Connecting Split Casing
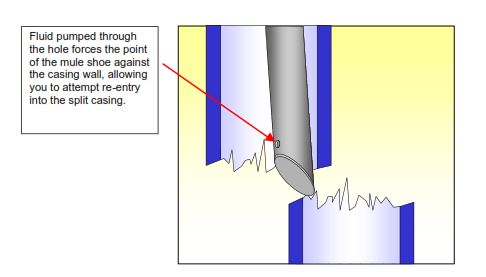
When you pump fluid through the kick joint, the pressure from the fluid will force the point of the mule shoe into the casing stub. Attempt to re-enter the split casing by working the shoe into it.
Important: Once you have re-entered the split casing with the kick joint, leave the joint in the bottom portion of the casing until you have aligned the casing with the string mill (casing alignment tool) and are ready to pipe trip out of the hole.
See the diagram below.
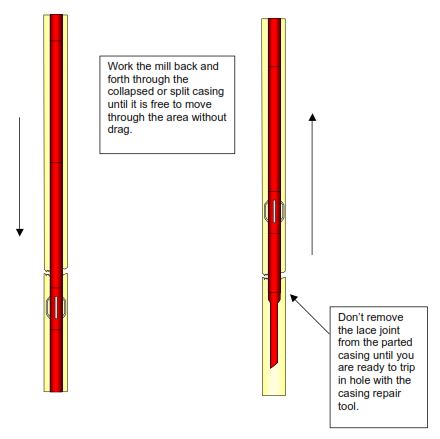
Using The String Mill
Work the string mill back and forth through the section of casing that is split or collapsed. Continue to work the mill until it is free to move through the area without drag (check also torque and drag in drilling).
Using The Casing Alignment Tool
| Step | Action |
| 1 | Trip in the hole with the casing repair tool below a cement retainer (packer). |
| 2 | Position the casing alignment tool so that it straddles the area that is parted. Half of the tool should be on one side of the casing failure and the other half should be on the other side. The ribs of the casing alignment tool have the same OD as the drift ID of the casing. This provides a tight fit. |
| 3 | Set the cement retainer with the work string. |
| 4 | Pump cement through the bottom of the tool and into the annulus. |
| 5 | Hold 500 lbs. of pressure on the tool for 30 minutes. This will allow the cement to fill the cracks and crevices in the casing and the formation. |
| 6 | POH |
| 7 | Make up a rock bit or a junk mill on drill collars and drill out the tool. |

I appreciated how this post discussed that gaining access to the base part of the casing is necessary if it is totally split in two. My friend told me that their project needs downhole oilfield casing tools. I think they should turn to a company that provides customers with the latest products to get the job done accurately.