- It is important to have the casing tally spreadsheet and running list sheet prepared as early as possible.
- Ideally, the casing running checklist should be ready for the rig crews as they reach section TD which will then give them enough time to prepare the decks for the start of the run.
- It is the Drilling Engineer‘s responsibility to keep track of who has been issued a copy of the casing running list. Should the running order then change, it is up to the Engineer to issue the new revision and most importantly to make sure that the original copies are destroyed.
- The joint numbers and lengths are transferred from the Drilling Engineer’s casing tally spreadsheet book into the rig tally book which is held in the oil and gas company office. An independent check of the transferred figures is then carried out.
- Once all the pipe is measured, then the total length should be calculated and this figure checked against the total length on the laser tally sent from town.
- The casing tally book figures are then transferred onto an Excel sheet and once more an independent check is made on the transfer of figures.
- The make-up loss figure is then subtracted from each joint to give the actual string length.
- The tally is then laid out as per the program requirements. The depth of sump, length of float shoe, shoe track, Casing centralizer positions, and crossover requirements are all accounted for.
- A physical check is needed to establish the exact distance of the wellhead hang-off point below the rotary (check also drilling rig components). The height of the wellhead should be tracked at each stage of the well’s construction and the slump figures reported each time a hanger is landed.
- With the hang-off point established, and an allowance made for the elevator stick-up (typically at least 1.7m) the space-out pups and landing string requirements are then calculated. N.B. The optimum landing string space-out will vary from rig to rig, however, the general rule of minimizing the number of pups run should be followed whenever possible.
- A running total of shoe depth is then applied to the tally and all points of interest, e.g. Casing thread types, joint weight or grading changes, centralizer types and fitting instructions, previous shoe depth, changes of formation, previous trouble spots, etc. are all added to the comments section.
- With the running order now established, the joints remaining on deck are listed both at the point of picking up the hanger and again for when the hanger is actually landed.
- Finally, the tally is then converted into a useable running list for the crew. It is important not to make the list too “busy”. The Driller simply needs to know the number and overall length of each joint, his current shoe depth, plus the detail contained in the comments section.
Casing Tallies Versus Liner Tallies
There are two different types of tubular tallies: 1) a casing tally spreadsheet and 2) a casing liner tally.
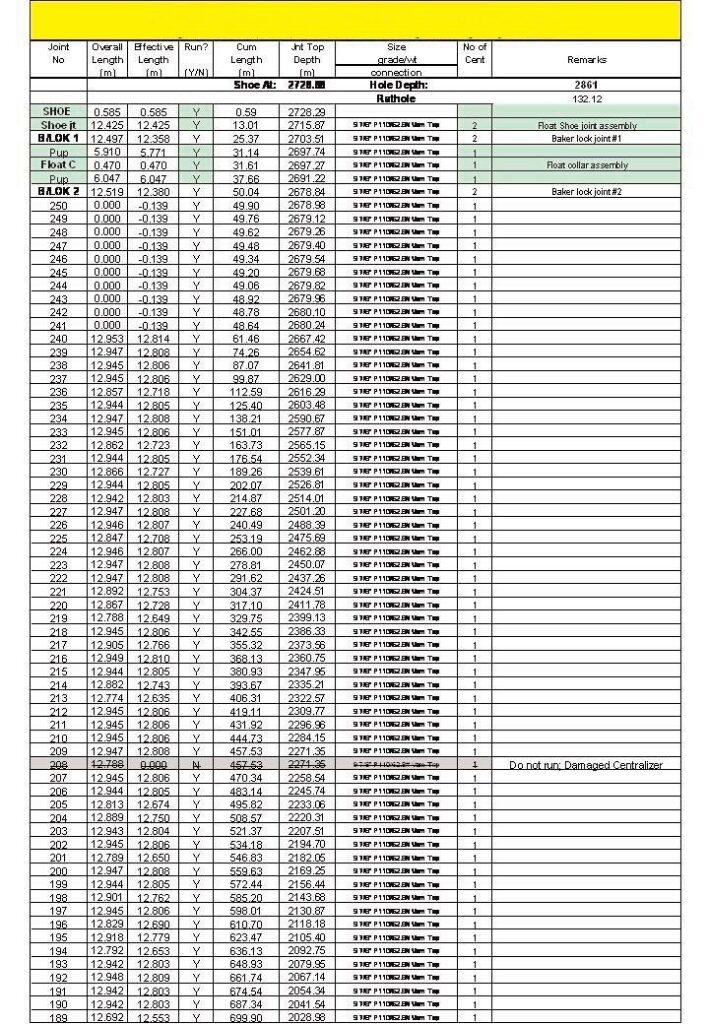
A casing tally works from a fixed point at the wellhead (e.g. hanger landing point) and the formulae in the spreadsheet calculate the shoe depth by adding the length of each joint below the wellhead to the shoe.
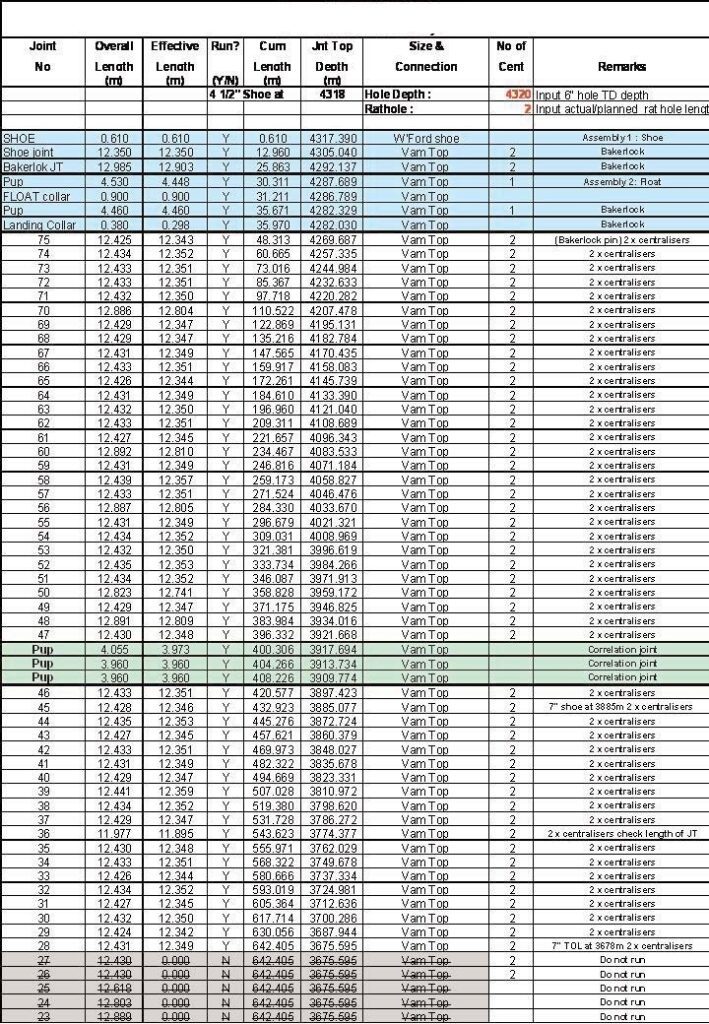
A liner tally is run until the shoe tags the bottom of the hole, then the liner is picked up 2m. The known depth for a liner tally (fixed point) is therefore the liner shoe depth which is equal to the total depth of the hole drilled minus a rathole, e.g. 2m. The liner tally works from a fixed point at the shoe and the formulae in the spreadsheet calculate the liner hanger system and packer depths by subtracting the length of each joint above the shoe back to the top of the liner hanger/polished bore receptacle.
The best practice and quality control checks required for preparing a tally are detailed below:
- Check the formulae in the spreadsheet to determine if it is a “casing type” or“liner type” tally (Check also: types of casing).
- The casing is commonly now measured in town using a laser. The laser measurements are generally full joint length (i.e. including threads or “threads on”), some- times may be effective length measurements (i.e. full joint length minus thread length – “threads off”). Check to make sure which was measured and painted on!
- The deck crew recorded the laser measurements that were painted on in town and the running numbers which they painted on when laying the joints out in rows on the rig.
- The DE or Drilling Supervisors should check 1 in 8 of the joints using the rigging tape and compare it with the laser measurements as a QA check. If there are significantly longer or shorter joints than the average, then the lengths of these joints should be double-checked.
- To save time, 1 in 8 of the total joints can be checked from the first row (e.g. check the first 10 joints laid out from 80 total joints).
- Input the measurements provided by the deck crew into the casing liner tally spreadsheet.
- Arrange an independent double-check of the spreadsheet to ensure that the measurements provided by the deck crew have been correctly input into the spreadsheet tally.
- Check the casing tally thread make-up loss length in the sheet.
- Note: the shoe joint does not have any make-up loss applied to it as there are no threads at the bottom of the joint.
- Check the total length of all the joint measurements input into the spreadsheet against the onshore laser measurement total length for all the joints sent to the rig. These two numbers should be the same. If not then either the deck crew has recorded an incorrect laser tally measurement or an incorrect value has been input into the spreadsheet.
- The following quality control checks should be included in the spreadsheet to ensure that the formulae in the spreadsheet are correct:
- Sum the effective length of all tubulars in the tally (including the landing string to the rotary table).
- Record the final depth in hole measurement from the tally.
- Record the final float shoe position.
- All of these numbers should be the same; if they are not then there is a mistake in the formulae in the spreadsheet.
Excelente trabajo