There are several methods for patching damaged casing while maintaining pressure ratings and without restricting internal bore diameters. The casing repair is made by removing the damaged section of the casing and then preparing the casing stub with a Dress-Off Mill.
The external patch is run in the hole on the bottom of the new casing string and externally engages the casing stub. The internal patch is a steel liner corrugated longitudinally to provide clearance for running inside the casing. Covered with a certain material to provide the required seal and the casing diameter may be reduced from 1/8-in. to 0.48 in. (12.20 mm).
Casing patches will pack off and become a permanent part of the casing string type. The patch forms a link between the existing casing below and the new casing above. Patches are available in Lead or Rubber Seal, Standard or Underwater Design, and Cementing Lead Seal styles.
External Casing Patches
External casing patches are used to repair damaged casing that is not cemented above the damaged area. This allows the damaged casing to be removed from the well.
External Patch Description
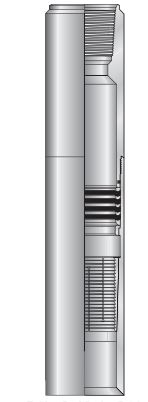
Bowen packer-type casing patches are external catch tools, designed to catch a previously prepared fish, pack it off, and become a permanent part of the repaired casing string. The same method of engagement and release, which is used for Bowen overshots, is employed in these casing patches. The patches feature positive engagement and positive seal-off in either direction and do not reduce the ID of the casing (casing size). Once the patch is set, it becomes a permanent part of the string and is usually cemented in place.
- lead seal casing patches
- packer type casing patches.
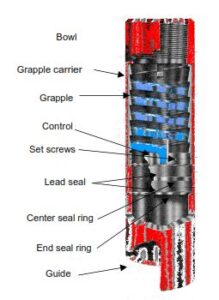
Lead Seal External Casing Patch
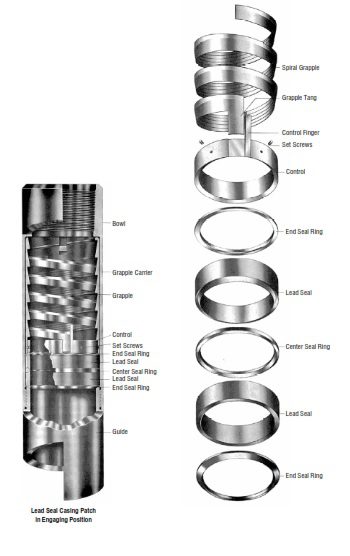
It is designed to patch damaged casing as simply, effectively, and permanently as possible. The Lead Seal Casing Patch will provide a higher temperature rating than a Packer Seal Casing Patch.

Lead Seal Operating Procedure
| Step | Action |
| 1 | Use an inside mechanical cutter to cut the casing below the damaged area and remove that section from the well. |
| 2 | Use a dressing mill to dress the top of the casing stub to a 45- degree bevel inside and outside. |
| 3 | Make up the patch on a running string of new casing and TIH. |
| 4 | As you reach the casing in the hole, slowly rotate to the right while lowering the casing patch over the stub. |
| 5 | Continue lowering until you bump up on the grapple carrier as indicated by the loss of weight on the weight indicator. |
| 6 | Take an upward strain, which causes the outer assembly to move upward while the engaged grapple, carrier, and control remain stationary. Compression between the carrier and guide causes the lead seals to flow around the casing forming an effective seal. The size of the patch will determine the load required to set it and will vary from 10,000 to 100,000 pounds. |
| 7 | Before testing the patch, lower the over pull to 40% of the set load. |
Maintaining the seal
Lead seal patches are used in wells that contain fluids and gases, which are harmful to synthetic rubber packers. The seals used are compression type, and multiple lead rings. Once the seals are set, a minimum amount of pull will keep them in the proper sealing position. The tensile load required to set the slips will be more than adequate.
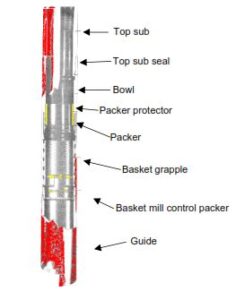
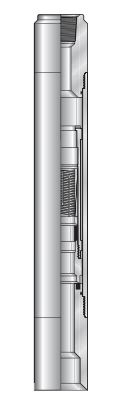
Packer Type External Casing Patch
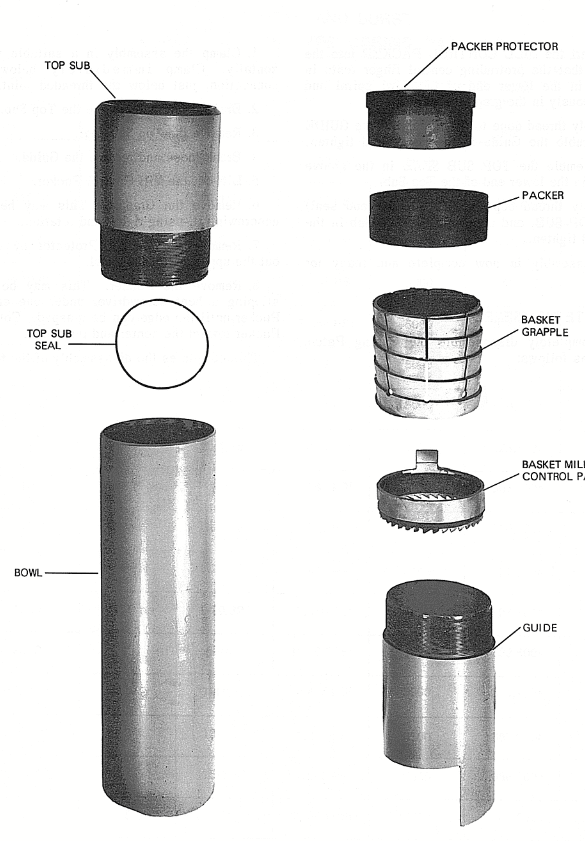
This type is designed to repair damaged casing efficiently and economically. The Rubber Seal Casing Patch will provide a higher pressure rating than a Lead Seal Casing Patch. Different seal systems can be utilized for certain corrosive and higher temperature applications.
Packer Type Operating Procedure
| Step | Action |
| 1 | Use an inside mechanical cutter to cut the casing below the damaged area and remove that section from the well. |
| 2 | Use a dressing mill to dress the top of the casing stub to a 45- degree bevel inside and outside. Dressing the cut casing will prevent the casing from snagging the rubber portion of the casing patch. |
| 3 | Make up the patch on a running string of new casing and TIH. |
| 4 | As you reach the casing in the hole, slowly rotate to the right while lowering the casing patch over the stub. |
| 5 | Continue lowering until you bump up on the grapple carrier as indicated by loss of weight on the weight indicator. |
| 6 | Pick up on the running string and apply sufficient pull to remove any slack from the string, and set the slips. No load is required to maintain engagement nor is any load required to effect or maintain a seal. |
| 7 | Pressure test the patch to the manufacturer’s recommendations. |
Underwater Lead Seal Type
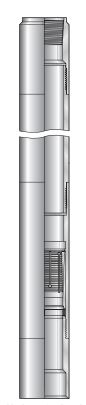
Many companies offer a dependable Underwater Lead Seal Casing Patch which basically follows the same field-proven design as the Standard Lead Seal type for onshore use with the addition of a certain length (+/-10 ft (3.0 m)) top extension. The extension allows the patch to be set from offshore floating rigs using underwater wellheads and Blowout Preventers.

Underwater Lead Operating Procedure
| Step | Action |
| 1 | Dress off the top of the cut with a dressing mill (milling operations). |
| 2 | Run the casing patch on the preselected joints of casing and casing hanger. |
| 3 | Approach the top of the casing stub with caution; if using a motion compensator, set it to a fine sensitivity. |
| 4 | Slack off over the stub and seat the hanger in the wellhead. Retrieve the hanger running tool. |
| 5 | Next, go in the hole with Casing Releasing Spear, engage the cut casing and pull it up into the casing patch extension with the required setting load. |
| 6 | Release the spear and retrieve. |
| 7 | Pressure test the patch. |
Underwater Rubber Seal Type
The Underwater Rubber Seal Casing Patch is identical to the Standard Rubber Seal Type with the exception of a top extension. The use of a +/- 10 ft (3.0 m) extension between the body and top sub allows the patch to be set from offshore floating rigs using underwater wellheads and blowout preventers.
Under Water Rubber Operating Procedure
Dress off the top of the cut with a dressing mill. Run the casing patch on the preselected joints of casing and casing hanger. Approach the top of the casing stub with caution; if using a motion compensator, set it to a fine sensitivity. Slack off over the stub and seat the hanger in the wellhead. Retrieve the hanger running tool. Next, go in the hole with a Type B™ Casing Spear, engage the cut casing and pull it up into the casing patch extension with the desired tensile pull. Release the spear and retrieve. Pressure test the patch.
| Step | Action |
| 1 | Dress off the top of the cut with a dressing mill. |
| 2 | Run the casing patch on the preselected joints of casing and casing hanger. |
| 3 | Approach the top of the casing stub with caution; if using a motion compensator, set it to a fine sensitivity. |
| 4 | Slack off over the stub and seat the hanger in the wellhead. Retrieve the hanger running tool. |
| 5 | Next, go in the hole with Casing Releasing Spear, engage the cut casing and pull it up into the casing patch extension with the required setting load. |
| 6 | Release the spear and retrieve. |
| 7 | Pressure test the patch. |
Lead Seal Cementing
The Lead Seal Cementing Casing Patch is a casing repair tool designed to permanently seal and allows cementing of the casing in a single trip.
Lead Seal CMT Operating Procedure
| Step | Action |
| 1 | The casing stub to be patched must be free of any cement on the OD and the top must be free of any burrs. |
| 2 | Once the casing patch has swallowed the casing stub completely, set down 10,000 lbs – 15,000 lbs (4,545 kg – 6,818 kg) on the patch. |
| 3 | The top of the casing should be shouldered against the top sub of the patch. The recommended setting load is then applied. |
| 4 | Slack off 25% of the setting load and test the patch. |
| 5 | After the test is complete, the string is once again slacked off to allow the lower casing stub to contact the shoulder of the patch. |
| 6 | This will open the cementing ports in the patch. After cementing, pick up to the original setting load. |
| 7 | The setting load should be maintained while curing the cement. |
Internal Casing Patch
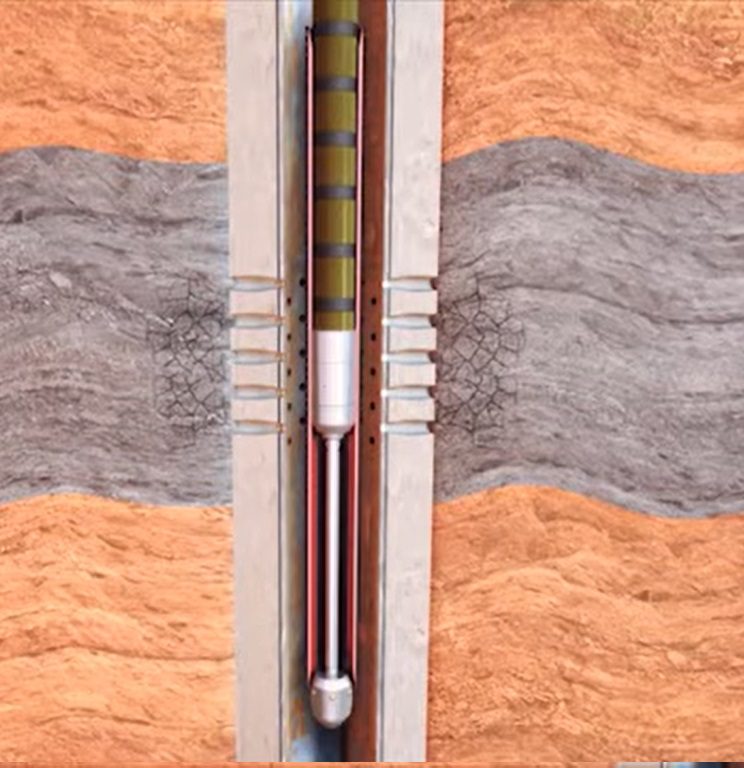
The Internal Casing Patch is designed to regain the integrity of the wellbore permanently by sealing off many types of leaks. It provides a seal against perforations and leaks, and it can also be used to reinforce areas that have been weakened by corrosion or internal wear.
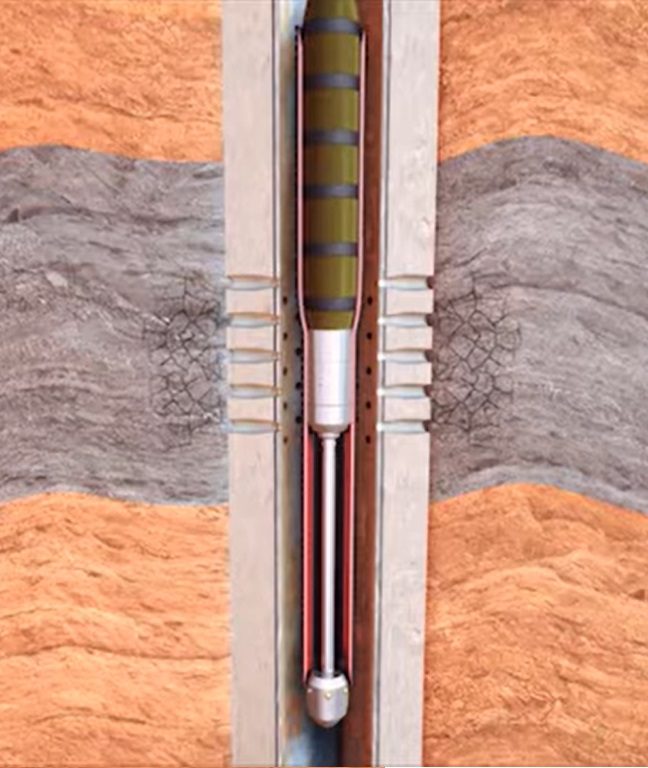
Internal Casing Patch Tool Description
The casing patch is an internal steel casing liner that is corrugated longitudinally to provide clearance for placement inside the casing. The standard WFD patch is 20′ long and fairly pliable before it is set. It is made of low-carbon 1010 annealed steel. The OD is wrapped in fiberglass and coated with epoxy resin. The tool has a temperature rating of 325 degrees F. The internal pressure rating for a one-inch hole or less is 9,850 lbs. The external pressure rating is 1,100 lbs.
Selecting the Right Patch
1- Type and Length: Determine the type and length of casing patch to be run using the following criteria:
- An accurate leak description
- Customer pressure requirements
- Future well operations (planned by customer)
- Well conditions
To ensure a positive seal and to allow for any setting misplacement, the patch should overlap the leak by 6 to 8 feet on each end. Split or corroded casing requires the patch to cover the entire joint plus 8 feet overlap on each end.
2- Restricted ID: The standard patch has a wall thickness of 0.120″ and reduces the casing’s ID by 0.30″.
Rig Equipment Considerations
Type and Length
The size, height, pulling, and pumping capacity of the rig (drilling rig types) are important in the planning process.
- The length of the patch that can be run in one piece is determined by the rig height.
- Pulling the setting tool through the casing patch could require pulling 60,000 pounds of overpull (overpull margin).
- The pressure required to set the patch could be as high as 5,000 PSI. A pump truck capable of high-pressure, low-volume pumping is recommended.
- The work string must be able to handle the pressure and pulling requirements to set the patch.
Operating Checklist
Prior to running the patch
| Step | Action |
| 1 | Run a casing scraper with a tapered mill that is 1/16″ larger (or as per manufacturer) than the drift diameter of the casing. In deviated holes, you should make a gauge run simulating the patch OD and length prior to running the patch. |
| 2 | Circulate to clean hole. |
| 3 | Run a casing alignment tool and perform a cement squeeze prior to running the patch if the casing to be patched is parted. |
| 4 | Correlate the difference in rig elevation for the correct depth |
Picking up the Casing Patch
Tool Assembly and Procedure
The tools generally used, starting at the top, are the following:
- Slide valve
- Bumper jar
- Hydraulic hold down
- Dual cylinder assembly with polished rod
- Extensions as required
- Safety joint
- Cone and collet assembly
| Step | Action |
| 1 | Lay out all setting tool components on the catwalk for inspection. |
| 2 | Conduct a safety meeting with the crew to explain the procedure |
| 3 | Pick up the setting tool |
| 4 | Make up the required length of extensions to the polish rod with the left hand safety joint on the bottom end |
| 5 | Install a safety clamp around the patch and strip it up over the extensions with the air hoist until the safety joint threads are exposed |
| 6 | Install the cone and collet, and bull plug on the safety joint |
| 7 | The patch rides on the cone and collet while going in the hole |
| 8 | Let the assembly in the hole and rest on the C plate |
| 9 | Install any spacer subs on top of the liner stop |
| 10 | TIH slow to the desired depth |
| 11 | When is position the patch is expanded by using a hydraulic cylinder assembly to pull the collet through the corrugated patch |
| 12 | After the first stroke, the collet is pulled through the patch by the work string |
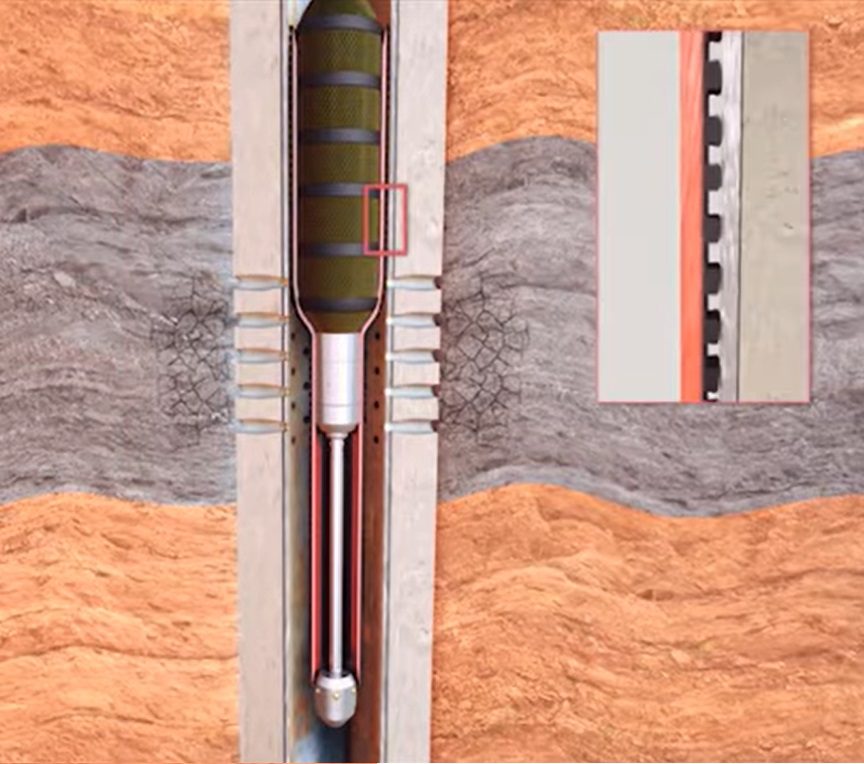
Sealing
The casing patch forms a sheet of metal inside the casing and makes the seal. It is not likely to crack or crumble. The epoxy resin extrudes into leaks and cavities in the casing wall, acting as a gasket and a secondary sealing agent. The epoxy resin is fully cured within 24 hours.