FIT or formation integrity test can be defined as the application of pressure by superimposing a surface pressure on a fluid column in order to determine the ability of a subsurface zone to withstand a certain hydrostatic pressure.
Why FIT?
The reason for performing the formation integrity test or formation competency test is to determine if a wellbore will support higher drilling mud weight so you can use the higher MWT in the next section.
How Can We Perform FIT?
In general, the formation integrity test is performed by pumping drilling fluid into the wellbore at a slow rate (typically 1/2 barrel per minute) with blowout preventers closed. Pumping into the wellbore should be continued until reaching the predetermined test pressure as calculated below:
Test pressure (psi) = 0.052 x Casing shoe TVD (ft) x [Required higher drilling mud density b/gal) – drilling fluid density currently in use (Ib/gal)].
Formation Integrity Test Calculations
When a Formation Integrity Test is required, the maximum pumping pressure is often expressed in terms of ‘Equivalent Mud Weight’ (EMW):
For Imperial units
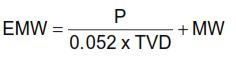
where:
| TVD | True Vertical Depth (ft) |
| P | Pumping Pressure (psi) |
| MW | Actual Mud Weight (PPG) |
For Metric units

where:
| TVD | True Vertical Depth (m) |
| P | Pumping Pressure (kg/cm2) |
| MW | Actual Mud Weight (kg/l) |
Formation Integrity Test Procedure
First Stage
- Drill out the float collar and float shoe, clean the rat hole and drill 10-15 feet of the new hole.
- Circulate a mud volume equal to the internal string capacity plus the new hole plus +/- 150 ft internal casing volumes.
Note: While circulating, use a clean mud. Also, ensure that the MWT in is the same as MWT out.
- Pull the drilling bit back inside the casing.
- Connect the cementing unit lines to the drill pipe. The unit shall be provided with high accuracy, low-pressure gauges.
We can’t use mud pumps as they haven’t a pressure recorder.
Selecting the pressure gauge range is based on the actual mud weight and planned formation integrity test pressure.
- Fill and test surface lines with drilling fluid.
- Break circulation with the cementing pump to make sure that the bit nozzles are clear.
- Stop pumping when circulation is established.
Second Stage
- Close the top pipe rams or the annular BOP.
- Open the annulus of the previous casings.
- Pump slowly until pressure builds up.
- Once pressure is established, pump uniform volumes of mud and wait for the pressure to stabilize
The range of flow rates are from 1/8 bbl/min to 1 bbl/min, however, recommeded values are 1/4 bbl/min or 1/2 bbl/min.
- Wait for two minutes, or the time required for the pressure to stabilize.
- Continue the formation integrity test and record the following:
- Total drilling fluid volume pumped
- The final pumping pressure.
- The final static pressure.
Third Stage
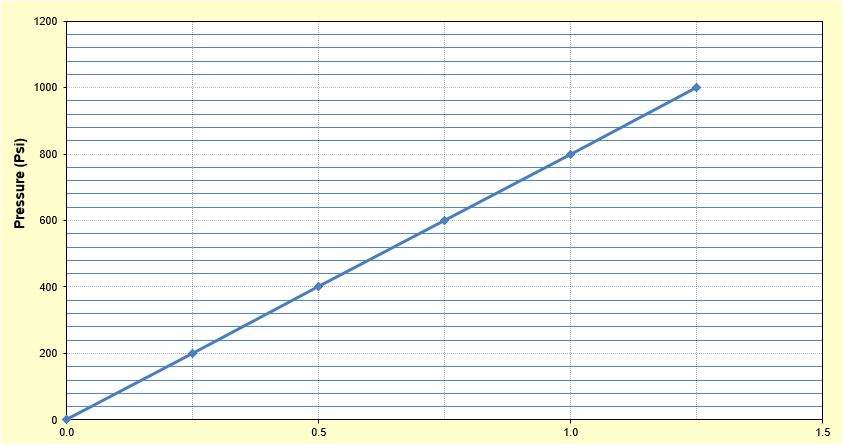
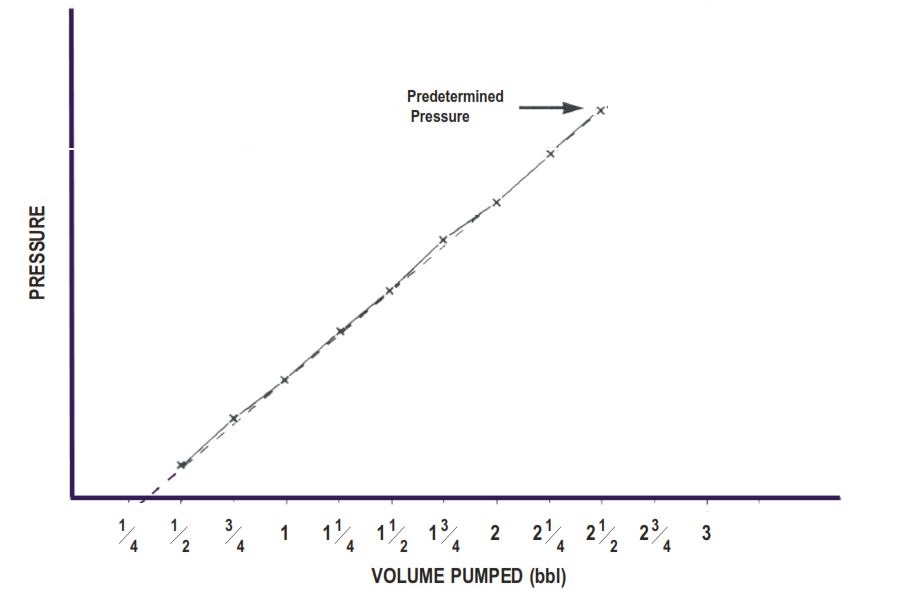
- Repeat steps 9, 10, 11 & 12 and plot pressure versus cumulative mud volume for each increment of pumped volume.
- Continue running the formation integrity test until the predetermined test pressure is reached.
- Wait for 15 mins to ensure that the test is held.
- Bleed off the pressure.
- Open the Blowout Preventer.
- Collect the data recorded during the test in a data sheet together with the following information: borehole diameter, depth of test, depth, and type of the last casing, mud density, plastic viscosity, filtrate, and gels.
7 Major Hints
- Firstly, while running the formation integrity test, you should prepare a sheet of a graph to plot the surface pressure against the volume that you pump in the well. Also, If you noticed that plotted curve started to flatten or the pressure began to decrease, stop the pumping immediately
- Secondly, formation integrity or competency tests and leak off tests are not synonymous
- Thirdly, Following the cementing of each casing string and upon drilling out below the shoe, either conduct a formation integrity test or a leak-off test to assure that the formation will support the maximum required hydrostatic pressure.
- Fourthly, you may need to repeat FITs in any open hole section and at any time while drilling the hole to maintain reliable information, even if it is customary to have it performed some meters (6-15 meters) below the casing. For instance, the setting of the casing can be in shale and the next sand formation may be several hundred feet deeper. This will certainly be more permeable than the shale, and performing a test will be good to identify the maximum pressure this sand can hold. If it is lower than the shale just below the casing seat, this sand becomes the limiting factor.
- Fifthly, you should keep the pumping rate within the limits described above. If the rate is too low, filtration losses will mask any leakage loss, or, if the rate is too high the formation may suddenly break.
- Sixthly, The longer the open hole section, the higher should be the injection rate. If the initial pumping rate is not sufficient, you should depressure the well, and restart the test with a higher rate.
- At last, please note If there is a float valve in the drilling string, you will not be able to carry out the test by pumping down the drill pipe. In this case rig up the cementing unit to the choke or kill line, fill and test the lines against the fail-safe and establish circulation through the drilling riser. Close the BOP and perform the formation strength test pumping down the annulus.
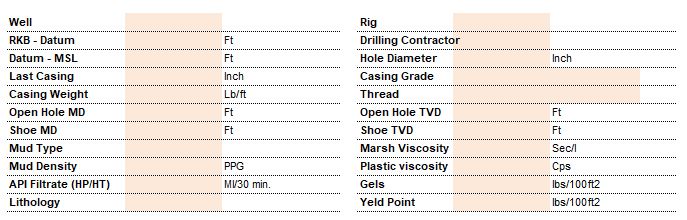
Reporting For Formation Integrity Test
Most oil and gas companies require the drilling engineer on the rig to perform the formation integrity test report which is easy. Below, we will discuss its details.
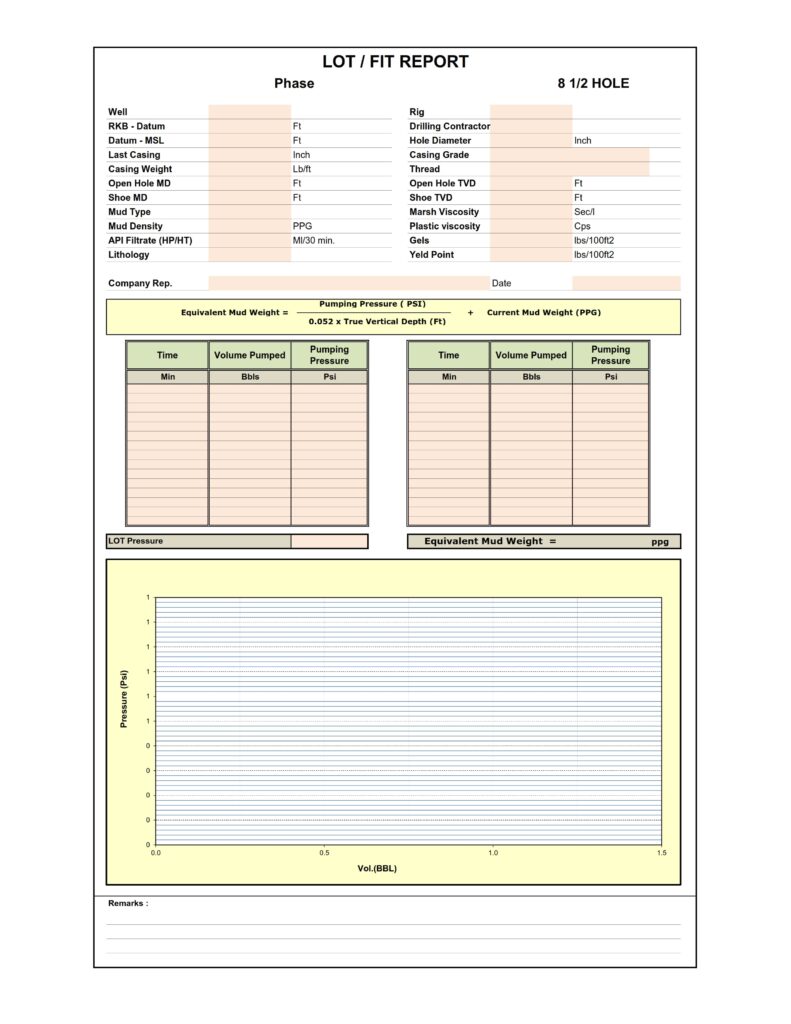
In the top of the example report, you will simply write some data concerning the well, last casing, casing weight, depths, type of drilling mud, lithology, mud properties, type of rig, and other general data.
In the middle section, you shall record the time increment, the volume of the pumped mud, the pumping pressure, and the test pressure.
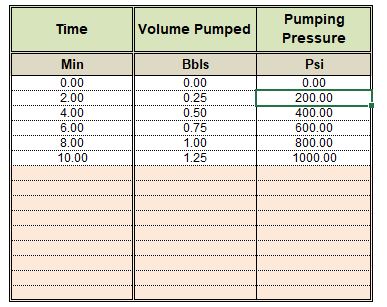
Once, you write these data, the excel sheet shall calculate the equivalent mud weight and you will see the chart will be drawn.